FableVision Learning Spotlight Blog
Categories
- Animation-ish 42
- Books 21
- Civics! 2
- Classroom Spotlight 17
- Conferences and Events 20
- Creative Educator 3
- Creativity 25
- Distance Learning 13
- Dot Day 22
- FabClassroom 28
- FabFriday 19
- FabMaker Studio 66
- FabMaker Studio Classroom 13
- FableFive 7
- FableVision Games 3
- Free Educator Resources 36
- HUTCH 1
- Home Activities 5
- In the Classroom 34
- In the News 11
- International Dot Day 23
- Ish 1
- Library 1
- Mapping the World by Heart 7
- Paul Reynolds 10
- Peter H. Reynolds 54
- Professional Development 9
- STEM/STEAM 20
- Storybook Academy 2
- Teacher Spotlight 14
- The Dot 17
- The North Star 2
- Words and Their Stories 1
- Zoombinis 3

Peggy Healy Stearns: Light Up the Holidays with this Maker Studio Lantern Activity
The following blog post is by Peggy Healy Stearns, Lead Software Designer, Fab@School Maker Studio at Reynolds Center for Teaching, Learning and Creativity. This post first appeared on her blog.
From wintry December to steamy July, flickering candles to blazing fireworks, light transforms the mundane to magical. Children, like adults, are captivated by light – especially when they make the magic themselves.
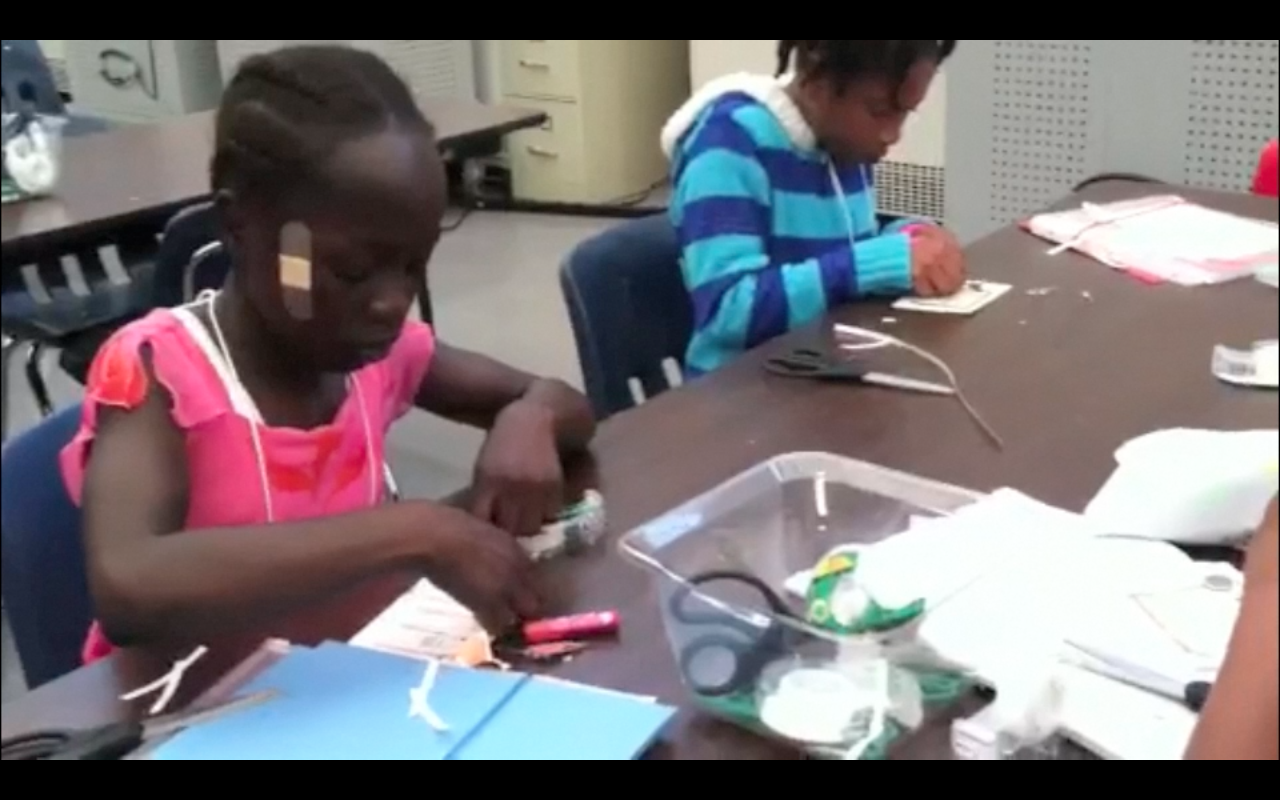
This lighted lantern project helps children do just that – and provides an easy and motivating introduction to 3D design. Kids can create a lantern from paper or cardstock and light it with either an LED votive or simple circuitry. They sometimes start with a template, but deeper learning occurs when children modify the design or, better yet, start from scratch.


To make a lantern from scratch, our students use Fab@School Maker Studio. They click to add ready made shapes, resize to customize, and snap parts together using the Magnetize tool to align. When shapes are snapped, the app automatically makes fold lines, so it’s easy for kids to create a flat pattern or net that folds into a 3D object. Using the Tab tool, kids can automatically create tabs for easy construction.
Because Maker Studio facilitates the mechanics, students focus on design, critical thinking, and creativity. Math is integral to the process, so problem solving doesn’t feel like an assignment. If kids plan to light their lantern with an LED votive, they determine an appropriate size and use the grid, manipulative ruler, or Show Dimensions to meet their specifications. If they want to include circuitry, they design a switch and use copper conductive tape, a coin cell battery, and a 3mm LED bulb. Students arrange parts so their design folds into a lantern and preview their construction in 3D view. As you would expect, most constructions require multiple iterations.
Building 3D shapes from the ground up in this fashion requires more thought than dragging a solid from a library and letting the software generate the net. The process supports the development of spatial reasoning and transformational geometry skills.

Students customize their lanterns with graphics or cutouts for holidays like Halloween or birthdays. Some kids design their own nightlights. Others transform lanterns into buildings to create a cityscape. Adults get into the act, too. One bride-to-be created lighted favors for her shower.
Hands-on activities are especially motivating when they connect to students’ lives and result in a useful product. They engage a broad range of learners, including students who don’t connect to more traditional instruction.
These compelling projects have the power to light up learning. And that is meaningful magic.
Fab@School Maker Studio has been piloted by hundreds of students. Version 1.0 will be released in January 2016. Click here for more information.

FableVision Creative Educator Spotlight: Andrew Hacket
Second grade students in Andrew Hacket’s class at the Mayo Elementary School in Holden, MA, recently completed a 10 week integrated science, social studies, and literacy unit named Recyclable City: Designing Against Disaster, in which they became project managers, city planners, cartographers and civil engineers.

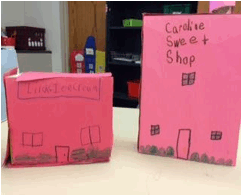
After learning about citizens, types of communities and the basics of economics, students were tasked with imagining and creating their own community. Each student completed a “building permit” outlining their plan for constructing a business/building for their city and describing how it would provide for the needs and wants of the community. Students then raided their recycling containers to provide the necessary building materials.
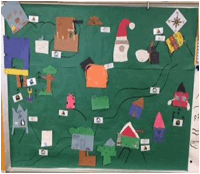
Following the building phase, students put on their cartographer hats as they learned how to read and create maps of their own using symbols, keys and labels. These skills were immediately put to use as students created roads and added symbols to their 3D recyclable city map.

“Andrew Henry’s Meadow” by Doris Burn served as the inspiration for the next step in the unit. Just like the boy in the story who built homes for his friends based on their personal interests, the second grade students designed and built their own homes reflecting their personalities and interests. These were made from construction paper and immediately added to a new classroom map.
As students learned about landforms, symbols were created to represent them and they were added to the map and key. Later, after learning about earth’s fast and slow changes, students returned to class one day to learn that natural disaster symbols had been added to their map. The homes that they had just created were now in danger and it was up to them to devise and create a solution to protect them from harm. Students implemented the engineer design process to imagine, plan, and construct systems out of recyclable materials. Finally, students were asked to improve their designs, taking into consideration how they could harness the natural power of the disaster to store or repurpose the energy to benefit their home or community.


The unit and student work were showcased at the Massachusetts STEM Summit held at the DCU center on November 10, 2015. The unit plan, list of addressed standards and links to photographs and materials can be found at http://mrhacket.weebly.com/teacher-resources.html

Peggy Healy Stearns: Under the Big Top With Maker Studio
The following blog post is by Peggy Healy Stearns, Lead Software Designer, Fab@School Maker Studio at Reynolds Center for Teaching, Learning and Creativity. This post first appeared on her blog.
At the STEAM Carnival in San Francisco, kids were eager to use Fab@School Maker Studio to design and fabricate paper and cardstock pop-ups, lanterns, buildings, and movable constructions. For adults, the colorful and lively carnival stirred memories of circus tents and pinwheels and cotton candy – and inspired carnival themed-projects. We set out to design these projects with Maker Studio. (All but the cotton candy, that is.)
Basic Pinwheel
Make a square and draw diagonal lines connecting opposite corners. Add a hole in each corner and one in the middle. Cut from the corners to about an inch from the center. Then fold all four corners to the center and place a pin through the corner and center holes.


This simple activity offers numerous opportunities to talk about shapes, angles, measurement, fractions, and other math concepts. More complex pinwheels, like that on the right, provide extended learning opportunities.
Beyond math and engineering design, pinwheels are a great introduction to windmills and turbines and related energy and environmental issues.
It’s easy to move from STEM to STEAM and integrate the arts. Let kids color pinwheels to create intriguing effects when spun. Challenge students to design more complex and unique pinwheels. There are plenty of models on the Internet. Test your pinwheels on a windy day or with a fan, and celebrate with a pinwheel art festival.
Circus Tent
Designing a circus tent is more challenging and involves some more complex mathematical and design thinking.


The sides are simple red and white panels. We (1) created a rectangle in Maker Studio, (2) used the Tab tool to automatically add a tab, (3) replicated the part, and (4) snapped copies together using the Magnetize tool to align them. Snap, snap, snap. Easy.
But how many panels do we need? And how wide should each panel be? That depends on the size of the tent. Kids tend to keep adding sides without thinking about the circumference of the tent, but this is part of the learning process. They’ll have to revisit this decision when they design a base to stabilize their tent and need to calculate the diameter.
Now on to the big top! What shape are the roof panels? How many panels do you need? How wide is the base of the panel? And how does the height or length of each panel affect the shape of the roof? There are dozens of questions, alternatives, and deliberations. Our first fabrication was not quite right, but fabricating with paper and cardstock is fast and inexpensive, so multiple iterations were easy, and we ended up with a satisfactory model.
We could have downloaded templates from the Internet, but allowing children to engineer their own tent supports deeper learning and greater pride in their work. And aligning hands-on activities with kids’ experiences, whether it’s a carnival or holiday or some other current event, makes learning more meaningful and memorable.
Above and Beyond: The Story of the 4C's
FableVision in collaboration with Partnership for 21st Century Skills has produced a short, animated film called Above & Beyond. Help your students go "above & beyond", by embracing the 4Cs - communication, collaboration, critical thinking and creativity. Enjoy & share this video and poster!

above_and_beyond_poster

We are Making a FAB Future Together
Here's a copy of the "Fab" poster the FableVision team gave out at the recent USA Science and Engineering Festival in D.C. We love the message and hope you do to!
Make a FAB Future Together